Has integrated login functionality
Description
To turn on the integrated login feature, go to the Properties pane on the UX Builder and check the 'Has integrated login functionality' property.
The UX Component can include integrated login/logout functionality.
This means you don't have to use a separate Login Component to authenticate users in your application.
The primary use case for integrated login in the UX component is for mobile applications where the application is typically built using a UX component.
However, another use case for the integrated login in the UX is to build a custom login dialog to replace the built-in Login component.
To turn on the integrated login feature, go to the Properties pane on the UX Builder and check the 'Has integrated login functionality' property, as shown in the image below:
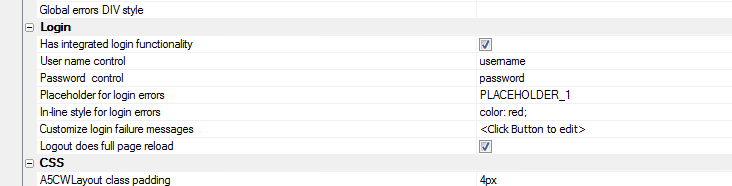
Once you check this property you get prompted for some additional properties:
- Property
- Description
- User name control and Password control
You must specify which controls on the UX component are used for entering the username and password. Your UX component will therefore need to have two controls (e.g. textbox controls) where the username and password are entered.
- Placeholder for login errors
You must put a placeholder control on the UX (see Placeholder in the Other Controls section of the UX Builder toolbox) to indicate where login errors should be shown. Use this property to specify the name of the placeholder.
- Customize login failure messages
You can customize the various messages that the security framework displays when login errors occur.
- Logout does a full page reload
When the user logs out, do you want this UX component to reload? If you check this option, the component's layout is re-computed on the server and controls on the UX for which membership in security groups are required are hidden.
Why you may want to enable Logout does a full page reload
It's important to understand why you may want to enable Logout does a full page reload:
Assume that when you design the UX component you set the security property on certain controls in the component so that they are only visible to users who are in a certain group (i.e. security role). For example, you might have a button called 'Increase Salary' and you might have set the security on this button to only show the button for users who are in the 'Manager' group.
Assume that the current user is logged in as a member of the 'Manager' group - so she sees this button.
After this user logs out, you will want to ensure that this button is no longer visible. So, forcing the component to reload will cause the server to re-compute the layout of the UX component, and the button will be removed when the server sends back a re-rendered version of the component - because the user will no longer be logged in as a member of the 'Manager' group.
Login/Logout Buttons
Once you have configured your UX component to turn on integrated login functionality, you will also need to add buttons to the UX component to login and logout.
The event Javascript code that will need for these buttons is shown below:
{dialog.object}.login();{dialog.object}.logout();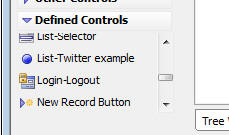
You can select the 'Login-Logout' item in the 'Defined Controls section of the toolbox to automatically add login/logout buttons and also the placeholder for login errors.
Server-side Events
When the user clicks the 'login' button to login, an Ajax callback is made to authenticate the user. There are several server-side events for login and logout.
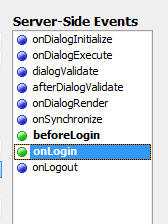
- Sever-side Event
- Description
- beforeLogin
This event fires before any attempt is made to authenticate the user. A possible use for this event is to log out any user who might be logged in (use the A5WS_LogoutUser() function).
- onLogin
Fires after the user is authenticated. The event fires regardless of whether the authentication was successful or not. The e.loginSucceeded flag indicates if the login was successful or not. An important use of this event is to force a reload of the component on login. See the discussion below on 'Forcing a Reload of the UX Component After Login' for more details. This event can also be used to set the 'friendly user name'. The 'friendly user name' is made available in client-side 'afterLogin' event. It can also be used in client-side watch expressions.
- onLogout
Fires after the user logs out.
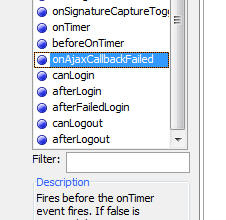
Client-side Events
When the user logs in or logs out there are several client-side events that fire, as shown in the image below.
The afterLogin event can be used to display a message on the screen indicating the (friendly) name of the logged in user.
For example, assume you have a static text control on the UX with this text:
Logged in as: <span id="loggedinusername"></span>
In the afterLogin event, you could add this code:
var ele = $('loggedinusername');
ele.innerHTML = e.userNameFriendly;
You might also put a client-side show/hide expression on the label as follows:
dialog.isLoggedIn = true
This will cause the static text control to be hidden when there is no logged in user.
In a Mobile application, a common design pattern is to put the login screen in a Panel Card and the application in one or more additional Panel Cards. The Panel Cards would then all be wrapped in a Panel Navigator that was set to 'programmatic' mode for the method of navigating the Panels. In the afterLogin event you would set focus to the first Panel Card in the application. In the afterLogout event, you would set focus back to the Panel Card that contains the login form.
Forcing a Reload of the UX Component After Login
After the user has logged in you might want to force the UX component to reload. Consider the following scenario which explains a use case for this option:
Assume that the application you have built is a single UX component, and it has integrated login functionality. Assume also that this component has certain controls that have security on them (for example a 'Set Salary' button that is only visible to member of the 'Manager' group).
When the UX is initially loaded, the 'Set Salary' button will not be visible (because the user is not yet logged in).
Now assume that the user enters their username and password and clicks the login button. This will fire an Ajax callback and the user will be authenticated. Assume that the user is now authenticated and is part of the 'Manager' group.
This user should now see the 'Set Salary' button, but does not because when the UX was originally rendered, the user was not logged in.
However, by forcing a reload after login, the component will be re-rendered on the server and the user will see the 'Set salary' button.
The way in which you force a reload of the UX component after login is by setting the e.url property in the onLogin server-side event. For example, you could add this code to the onLogin server-side event:
e.url = "<thisComponent>"
If you are forcing a reload after the UX component loads, you will likely also want to enable the Logout does full page reload property.
Friendly User Name
For security reasons, it is not a good idea to expose the logged in user name on the client-side after the user has logged in. In the onLogin server-side event you can execute code to translate the user name that the user logged in with into a 'friendly' user name which can be safely displayed on the client-side.
For example, assume that you had a table that had two columns - 'userName' and 'friendlyUserName'
An example entry in the table might be:
jsmith23 John Smith
In your onLogin server-side event you would execute code to set e.userNameFriendly by looking up the friendly name for the user name.
Once you have set e.userNameFriendly in the server-side event, it can be used in the afterLogin client-side event and also in watch expressions.
If you do want to have the real logged in user name available on the client-side (for example, so that you can display it in a message like 'Logged in as: [email protected]'), then you can always set the friendly name to the same as the user name in the onLogin server-side event.
Client-side Watch Expressions
The client-side watch expressions (e.g. the show/hide, enable, conditional style) can reference the following system fields that are populated with login information:
- dialog.isLoggedIn
- dialog.loggedInUserNameFriendly
The system fields that you can use in watch expressions also include dialog.loggedInUserName, but this value is always set to 'hidden_for_security_reasons'. If you want to make the real logged in name available on the client-side, then you can set the friendly user name to the real logged in user name in your server-side onLogin event.
Mobile Applications - Adding Login/Logout
The following section describes a common design pattern for adding authentication to a mobile application.
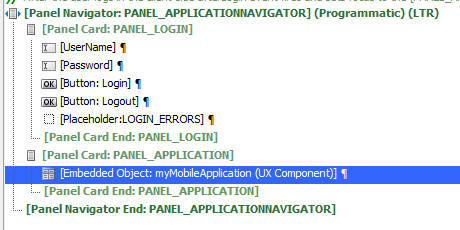
In the image below we show the structure of the UX component that contains the login/logout logic.
You can get a quick start building this component for yourself by selecting it from the list of available templates when you create a new UX component. Select the Security Framework - LoginComponentMobileApp template.
The basic structure of this UX component is a Panel Navigator with two Panel Cards. The Panel Navigator has been set to 'Programmatic' (meaning that a Javascript command, and NOT a user 'swipe' on the screen is needed to navigate from one Panel Card to another).
The first Panel Card contains the login and password prompts.
The second Panel Card contains an embedded UX component. This component is your application.
After the user has successfully authenticated, the client-side afterLogin event fires and set focus to the Panel Card that contains the embedded UX (i.e. the application). The client side event executes this code:
{dialog.object}.panelSetActive('PANEL_APPLICATION');The Embedded Object control (i.e. the UX component for your application) is set to only render when the Panel gets focus. This is very important. It means that the embedded component is not rendered until AFTER the user is authenticated. At that point, the server knows what role (i.e. groups) the user is a member of, and when the component is rendered, any controls that are conditioned on membership of specific security groups can be included or excluded in the component.
When the user logs out of the application, the PANEL_LOGIN panel in the parent UX component is shown.
Watch Using a UX Component to Create a Login Component for a Mobile Application in the Videos section below to see how an authentication layer can be added to a mobile application:
Videos
To use the project, create a new, empty Web Project, then click the 'Open Project Folder in Windows Explorer' button and paste these files into the folder. The passwords for the sample accounts are:
- [email protected] - aalpha
- [email protected] - salpha
- [email protected] - malpha
Using a UX Component to Create a Login Component for a Mobile Application
A common requirement for any application, Mobile included, is to authenticate users before they can interact with the application. There are several ways in which authentication can be performed in Alpha Anywhere. These include using the standard Login component, or using the AppLauncher. In addition to the above two techniques, you can also build a UX component for performing the authentication.
The advantage of building the Login screens using a UX component is that you can make a much richer UI for the login and it can include standard mobile elements like Panel Headers, etc.
In this video we show how an authentication layer has been added to a mobile application.
- Watch Video - Part 1
- Watch Video - Part 2
- Watch Video - Part 3
- Watch Video - Part 4
- Watch Video - Part 5
See Also